
My latest guitar project: A conversion of an acoustic student guitar into a wicked cool resonator guitar.

^Before. I began with a student guitar because I had no idea what I was doing so it was low risk. Here all I've done so far is remove the strings ad tuning pegs.

^ Next I took a putty knife and thin saw blades and began to remove the face of the guitar.

^ I also needed to remove the fretboard and neck.

^ After removing the face of the guitar, I measured and cut a hole to fit the diameter of the resonator cone that will be placed inside.

^ This is a pot lid with the handle removed. It will make an excellent resonator cone!

^ Holding it in place you can get the feeling of how it will fit.
NOTE: when assembling this guitar I had not seen a diagram of which way the cone should face, pointed up or down. I figured down would have the best tone because I could get a good ring when I hit it.) Turns out this is not the way these guitars are built, BUT mine way totally worked and I am glad I did it the way I did.
Here's how I attached it: I took a coffee canister (ya know that metal coated cardboard stuff?) and cut the top off so that all I used was about 3/4 of the height of the can and the end with the bottom of the can on it. I then made cuts about every inch or so all the way around the can and fanned them out like an octopus. These became the tabs I glued down to the bottom of the guitar. I placed the cone (point down) on top of the former bottom of the coffee can and screwed it down. (Making sure it would end up centered in the fuller part of the guitar body.) Also, I made sure that once glued down, the entire height of the combined cone and coffee can is just a hair below the height of the guitar.

^ Fast forward and I have filled in the original sound hole with leftover face wood from the cutout I made. I painted the body. I covered the cutout with metal mesh from a broken bird feeder screen. The ring is the ring from the coffee can. The original bridge is on there (although I trimmed it up a bit.) Also I used a tin can to use as an echo chamber/amplifier that goes OVER the strings. Now I'm attaching the neck. At this point I have no idea if this will work AT ALL since I can't hear how it sounds until the strings are on it, so the guitar has to be completely assembled.

^ A full body shot of the finished guitar!

^Here's the whole resonator complex. (What is all that sawdust doing on there?!)

^ Close up of my $0.01 washers

^ I added these sound holes to make the guitar louder. It worked!

^Signature, guitar name (Abraham) and "FOUR" Indicates what number of guitar build/customization this is for me. This is my 4th guitar project I've finished.
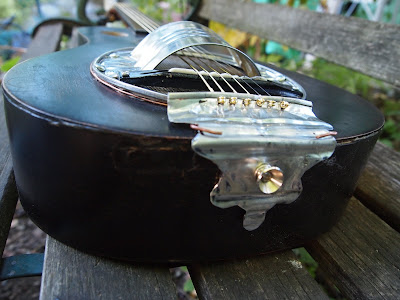
^ Here's a close up on the tail piece. It is made out of a tin can also. I drilled 6 holes in it to run the strings through. I swear, I could probably make an entire guitar out of a tin can!

The end! I will be showing this guitar (and others) in a gallery in St. Johns/North Portland in October.